


Incorporating shiplap into a space can elevate its aesthetic appeal and texture. While it may not be the most challenging of remodeling projects, there are essential steps that must be taken prior to starting the installation.
You can nail shiplap directly over drywall or remove the drywall first before installing. In both cases you need to make sure you are nailing into the studs behind the drywall and not just into the drywall itself. You will actually have better insulation from temperatures and sound by installing the shiplap siding over drywall.
In the rest of this article I will try to create a bigger picture for you, and present to you available ways of incorporating shiplap into your home. Let’s go!
What we cover
ToggleWhy shiplap inside your house?
Because shiplap is something that you’ve seen as an exterior siding, you might be wondering why to use it indoors. One of the main reasons is that wood shiplap panels will provide character and texture more than plain walls.
Shiplap can be molded into any decorative thing, and you can capture different decorations to add romance to your home that only wood can provide.
Shiplap wood can make a blank white wall a nice accent wall that can bring vividness into your home. Also, the shiplap cheaper nature makes it a great choice for you.
Considerations when installing shiplap over drywall
Existing damage – The first thing to consider is if the existing wall is damaged. Small bumps and small imperfections will not compromise the installation, but larger issues with the walls might need to be looked at before proceeding.
Wall studs – You will need to nail the shiplap to existing wall studs. Nailing onto just drywall will not do the job. Use a stud finder to make it easier to locate them.
Nail length – Make sure you use nails that are going to be long enough to go through the siding, drywall and enter the stud. The extra thickness of the drywall will come into play.
Use this FREE service
HomeGardenGuides.com is a free service that quickly matches you with top-voted local Mold Inspection Specialists.
You can get 3 estimates fast by real certified experts in your area in just 2 minutes.
- Scroll to the top of the page and enter your Zip code.
- Answer questions about your mold job
- Your roof painting details are forwarded to three local experts. They will send you a price estimate for the job and some friendly advice.
IMPORTANT: There is no obligation to hire. This is a free tool and service to be used at your pleasure.

How to install shiplap over drywall?
You have two options, DIY or hire a professional. If you hire a professional you can save time on the installation but you will spend more money. Because it is not difficult to do it yourself, follow this easy tutorial that follows to help you build a new wall that is commendable.
Give the shiplap time to season
It is generally known that wood is a delicate material when it comes to the weather. Extreme and sudden variations in humidity can compromise its integrity. So if you don’t want to face this situation let the wood adapt to the room where it will be installed.
Several days in the environment where it will be installed will be enough for shiplap panels to adapt to the conditions. Painting the wall with a dark color before putting shiplap over drywall will help to hide any possible cracks.
Locate the studs
As with all installations of the new coating over the existing one, the biggest problem when you put shiplap over drywall is to find the supporting structure beneath. In this case, the supporting structure is the studs and they had to be the base on which you will nail the shiplap boards.
Horizontal VS Vertical design
Horizontal shiplap design is easier to do because boards are installed perpendicular to the studs and there will be always one stud under.
On the other hand, vertical shiplap design is more complex because studs are located parallel to the shiplap and may never meet. In this situation, you will need to create additional support using 1/4 inch cleats, which you will need to screw onto the existing support.
Process of shiplap installation
When you have found all the studs and marked them the installation can begin. Let’s start with the tools required and their prices at Amazon.com.
- Level – $15 – $30
- Stud Finder – $18 – $80
- Pencil
- Measuring tape – around $20
- Table saw – $300 – $460
- Compound miter saw – $250 – $520
- 18 gauge 1 ¾” brad nail – around $84 for 12 boxes pack
- Nail gun – $250 – $500
- Hand jigsaw – $20 – $65
- Drill – $75 – $200
- Caulk gun – $12 – $20
- Heavy duty adhesive – around $40 for 6 – Pack
- Nickle or nail for spacing
Steps of the installation process
Follow these steps to have a successful installation process:
- Previously mentioned, give the wood time to season at least 72 hours. Do not store your shiplap in any environment where drastic or prolonged fluctuation in humidity will occur, protect your shiplap.
- Mark the locations of the studs for nailing the shiplap or you can apply a construction adhesive such as liquid nails. If you apply directly to the studs, check local building and fire codes.
- Setting the first piece properly is extremely important to ensure a uniform application. For example, start the first board in one corner, leaving ⅛ gap between the corner and the first panel, keeping the longer flange to the top. By using heavy-duty adhesive set the board and make sure it is leveled.
- Use a nail gun with 18 gauge 1 ¾ long brad nails and nail through the top loner flange. On this first board place the second nail approximately 1” from the bottom edge.
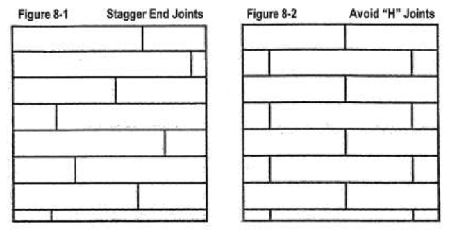
- Continue fastening the shiplap by leaving a 1/16” gap between all ends but joints for expansion and contraction. By using Nickle or a nail for spacing to achieve the desired look and during the whole process check the level.
- If your wall is longer than 16” stagger the second row so the end joints don’t line up and avoid the “H” joints.
- When you get to an outlet, measure, and mark the hole on the board. Use a drill and jigsaw to cut the holes.
- If you’re going with the vertical design, you must first add furring strips to the studs every 24” and use the same size brad nail.
- When you reach the top of the wall, measure the width for the last section and cut the final plank using a saw with a guide.
When cutting, the finish side should be face up. Slowly cut for a smooth finish. Also, some contractions and expansions of the shiplap should be expected.
Cover the nails and add color
You want to cover the exposed nails, but you won’t achieve that by simple painting.
Here is what you do, get some spackle and fill the holes by brushing the spackle over the nails, and after the spackle dry sand the surface with 400-grit sandpaper until you get a completely flat surface.
After all, proceed with painting and add some finishing touch wall hangings such as mirrors, artwork, or other decorations.
Benefits of installing shiplap over drywall VS studs
Even installing shiplap walls over drywall is possible, there is no doubt that installing shiplap directly onto your studs is easier. That is because each stud is easy to see and you don’t have to go through the process of finding and marking them all.
The biggest benefit to installing over drywall is that you will have a continuous barrier behind the boards that will prevent air leakage and therefore you will have a more energy-efficient home. You will lose less cold air during the summer when you use your AC and less warm air during the winter so you will reduce your electricity and gas bills.
FAQ's
Yes. If you decide to have a darker shiplap, white drywall behind will ruin the look especially with the separators being used. So it is best to cover or paint the drywall first so you can carry your color scheme out fully.
Without knowing the exact location of the studs you will not be able to know where to anchor your shiplap boards securely.
If you nail the shiplap to the papery drywall they will rip out very fast especially if you hang things there. That will cause significant damage to your walls. It is recommended each piece of shiplap be firmly anchored to at least one wall stud, or even better two.
Actually, drywall is cheaper than shiplap if you are using it for the interior. However, the cost may increase if you start using more variation during installation. The cost of both of them varies when you look at the base cost of each material.