


Mold leads to the appearance of unattractive black and green stains on your wallpaper. Without quick removal, it has the potential to emit spores into the atmosphere. These spores can induce severe allergic reactions and issues with breathing for the people living in your home. Continuous exposure to these mold spores may cause respiratory illnesses.
Therefore, if you want your wallpaper to retain its aesthetic appeal. And if you also want to protect your family from mold-related health problems. Knowing how to safely and effectively remove mold from wallpaper is a must. Here is what you should do as soon as you notice signs of mold growth.
What we cover
ToggleStep 1: Identify the cause

There is no point in getting rid of the mold on your wallpaper only for it to grow back soon thereafter. Knowing the cause of the mold is thus important as it gives you the opportunity to be proactive in solving the mold problem in your home. Also, identifying the cause will help you determine how to go about the removal process.
There are two things that have to exist for mold to grow on wallpaper. The first is a food source for the mold. And the second is moisture.
Most wallpapers are made from materials that mold can feed on. And even if they are not, they are usually secured in place with glue. As a result, the food source component is usually available in almost all cases. Therefore, the only variable that you can control is moisture presence.
In most cases, high humidity is to blame for mold growth on wallpaper. This is so especially in areas like bathrooms. Water spills can also be to blame for kitchen wallpaper mold growth. And in some cases, the cause can be as a result of leaks due to faulty plumbing or a roof leak. Whichever the case, solving the excess moisture problem should be the first thing that you do.
Step 2: Protect yourself
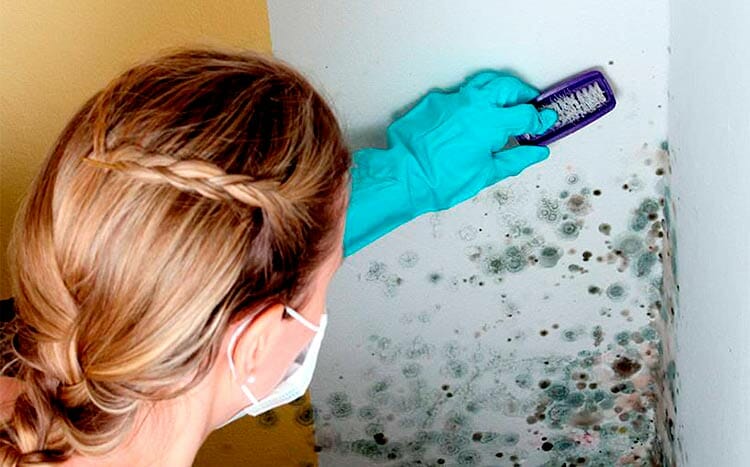
Before you start working on your mold problem, you need to wear protective gear. Remember, mold triggers allergic reactions. It can cause severe skin irritation and eye irritation. When inhaled, it can also compromise your respiratory system. As a result, you must always wear the appropriate safety gear to protect your eyes, mouth, skin, and respiratory system.
A respirator is great for keeping your lungs free from mold spores. Long-sleeved clothing and long pants will help to shield your skin from mold contact. And a good face mask will keep mold from your mouth. As for your eyes, goggles will come in handy.
Since you will be dealing with potentially corrosive chemicals, protecting your hands by putting on a pair of rubber gloves is also recommended.
Step 3: Prepare the cleaning solution
There are three main options that you have as far as getting rid of mold from wallpaper is concerned. You can use either bleach, vinegar, or baking soda. All of these cleaning agents are great at killing mold and so what you end up using will largely depend on your preference and whether or not the solution reacts negatively with your wallpaper.
To prepare the vinegar solution, all you need to do is white vinegar and water. Simply mix one part of distilled vinegar with two parts of water in a bucket. For the baking soda solution, mixing one spoonful of baking soda in a water bottle and then shaking it will be enough. Combining both vinegar and baking soda is also an option.
As for the bleach solution, start by pouring a cup of bleach into a bucket. Add a gallon of water to the bleach. And to improve the solution’s ability to lift dirt and debris, add a little bit of dish soap.
Step 4: Test the solution on the wallpaper
To avoid the risk of ruining your wallpaper, it is always advisable that you test the cleaning solution on a small area first before using it. Choose an inconspicuous area like a corner or an area that is near the floor. Simply use a brush to wipe the area and if the solution ruins the wallpaper, then you have to look for an alternative.
Step 5: Mist and rub
Pour the solution into a spray bottle and then spray it on a sponge to a point where it is damp. If you don’t have a spray bottle, you can just dip the sponge in the bucket, but you will have to wring it before using it on the wallpaper.
Rub the affected area with the sponge in circular motion while regularly misting the sponge. Do this until the ugly mold spots disappear. And after you are done, don’t rinse it with water.
Step 6: Wipe with a soft towel
After you are done rubbing the mold off your wall, simply use a soft towel to get rid of any excess solution with a soft dry towel.
Step 7: Improve air circulation
To accelerate the rate at which the wallpaper dries, you need to improve airflow within the area that you are working on. Start by opening any windows and doors. If you have a fan, turning it on will also help.
Step 8: Prevention of future mold
To prevent future mold growth, you will need to reduce the humidity in the affected area. This means having to keep windows and doors open for extended periods. Investing in a good fan and letting it run for a while especially after the area has been used will also help to reduce air moisture.
If the area in which the wallpaper is located is spill-prone, then regularly wiping the wallpaper will help. However, if this doesn’t work, you may have to invest in a waterproof wallpaper or one which isn’t made from mold-friendly materials.
What if the mold is behind the wallpaper?
If the mold is behind the wallpaper, you will need to first remove the wallpaper and then use any of the solutions above to kill the mold. To achieve this, you will need a few extra tools. A scoring tool, a scraper, and wallpaper stripping solutions are some of the extra tools that you will need in order to get the job done.
FAQ's
What causes black mold on wallpaper?
High humidity in a home and water spills are the most common causes of black mold on wallpaper. Leaks from the plumbing system and roof leaks are also known causes.
Is there mold-resistant wallpaper?
Yes, there is mold-resistant wallpaper.
Since mold requires moisture in order to grow, any wallpaper that is moisture-resistant can be said to be mold-resistant. Applying mold-proof wallpaper paste on wallpaper can also improve its ability to discourage mold growth.
Does bleach remove mold?
Yes, bleach can remove mold. This is because it kills mold, and so when mixed with water and dish soap, it can be used to effectively get rid of mold.
However, when using bleach to remove mold from a wallpaper, you should be aware that bleach can discolor some materials. Therefore, testing the bleach solution on a small and inconspicuous area is always advisable before using it on the whole wallpaper.
Does vinyl wallpaper stop mold growth?
Vinyl wallpaper tends to be moisture resistant. It is also not cellulose-based, and so it usually discourages mold growth since it doesn’t offer mold a ready food source.
However, it cannot stop mold growth. This is because moisture can seep behind the wallpaper and this may lead to mold growing behind the wallpaper. And in cases where there has been flooding, vinyl wallpaper can in fact lock in moisture in the walls, encouraging mold growth. Furthermore, if there is already mold on the walls, the only way to stop its growth is to kill it and then remove it.
Using qualified contractors to remove mold from your wallpaper
If you don’t have the time to remove mold on your own, or if you simply need the peace of mind that comes with professional mold cleaning, then you should use HomeGardenGuides.com. It offers a free service that quickly matches you with the top-voted local mold remediation contractors.
Using the website, you can get 3 estimates fast by real certified experts in your area in just 2 minutes. Here is how it works.
- You scroll to the top of the page and enter your Zip code.
- Answer questions about your mold remediation needs
- Your details will be forwarded to three local experts.
- You will then receive a price estimate for the job and some friendly advice.
IMPORTANT: There is no obligation to hire. This is a free tool and service to be used at your pleasure.
Using this service will simplify your search for mold remediation contractors, something that will enable you to eliminate your mold problem before it gets worse.