


Initiating tasks related to skim coating demands careful attention, skillfulness, expertise, and precision. While there are individuals who might choose to tackle this job independently, seeking the help of a professional is a wiser and more efficient approach to ensure better results.
The national average to skim coat a ceiling would cost you around $215 and $260, and this would run for about 3.5 hours. For scale, the cost to skim coat a ceiling would range between $1 to $3 per square foot.
While this may be a reliable approximation, there are still a few factors that could affect the cost of skim-coating a ceiling. This includes the size of the ceiling, the complexity of the project, the layers required, and the finish that you would prefer.
What we cover
ToggleAverage costs to skim coat a ceiling
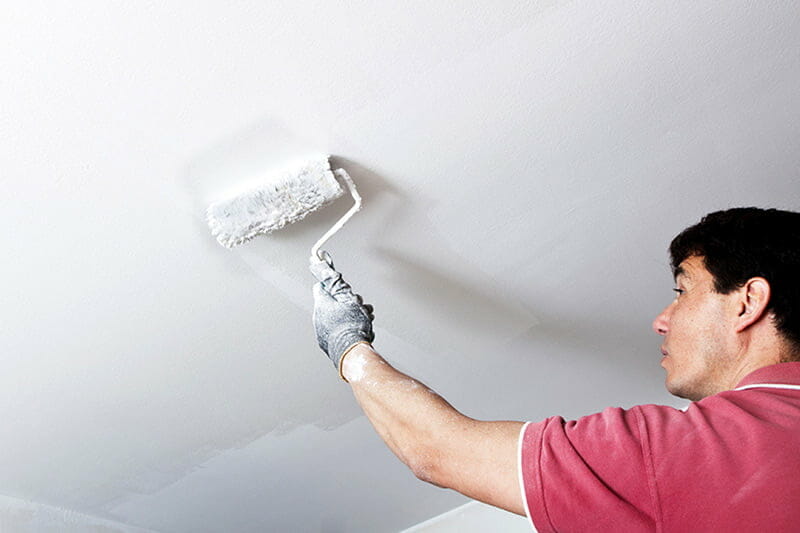
A skim coat is a joint compound that is directly applied to a surface using a spray rig, a paint roller, or by hand. Afterward, it is straightened and smoothened by a tool to make walls or ceilings appear cleaner and new.
Skim coating your ceiling can be the solution for uneven surfaces, and damage in texture, and be a primary fix before a painting job. Since it requires skill in leveling surfaces, it also requires paying for the professional’s expertise and experience.
National average cost to skim coat
The national average cost for skim coating would best be understood in terms of the items that need to be considered.
Cost to skim coat
| Materials (per square foot) | $0.34 |
|---|---|
| Labor and Materials (per 500- square foot) | $492 |
| Ave. Cost Range Labor and Materials (per 500-square foot) | $450 to $533 |
The cost to skim coat a ceiling depends on the type of finish or quality that you want for your ceiling. For reference, below are the price ranges:
Cost to skim coat a popcorn ceiling
Most homeowners prefer to skim-coat a popcorn ceiling instead of the complicated process of removing it. By doing so, expenses are drastically lower, and it saves more time and labor.
The average cost to skim coating a textured or a popcorn ceiling is as follows:
Cost to skim coat a popcorn ceiling
| Average Cost (per square foot) | $1 to $1.50 |
|---|---|
| Average Cost Range (per area) | $300 to $450 |
Labor cost to skim coat
Considering that applying a skim coat can be labor-intensive, there are a few things that need to be considered in calculating the costs. This will include the transportation, the prep work, the clean-up job, and the sourcing of your materials.
If your ceiling requires any repairs, this shall also be considered included in the labor cost. If your joint compound contains tricky chemicals, you would also need to consider abatement costs, as well as permits and other necessary papers.
For reference, the following can guide you in estimating your labor costs, and the details of what you are paying for.
Basic Labor
Including but not limited to prepping and sanding surfaces, mixing of the compounds, professional application of a skim coat
Average cost: $287 – $348
Materials
Including but might not be limited to seam tapes, corner beads, fasteners, and the compound to be used as a skim coat
Average cost per 534-square foot area: $172- $200

Skim coating your ceiling: DIY vs professional
Luckily, the materials involved in skim coating your ceiling are not hard to buy from a local store. The tools involved are not also required to be industrial-grade for you to do it on your own if you choose to do it at a basic level.
Doing the job on your own can help you save more money, and you can do it on your own schedule. This option works best for people who intend to save a few extra bucks, and for people who would rather do it within their timeframe.
However, even with the aid of how-to articles, and a lot of helpful YouTube videos all over the internet that can guide you through the steps in the skim coating, it still might not come as easy as you think.
Hiring skim coat contractors
This is when hiring a professional becomes a smarter and more efficient choice, especially when your ceiling height is too high for you, or if you have very little experience in home improvement activities.
If you hire a contractor to do the job, they will source the materials to be used for you, saving you the trip to the store. They will also be bringing in their own tools for the whole process, which saves you the hassle of buying new ones.
Having a professional do the job does not only assure you that it is done with expertise and better precision but having them do it just saves more time. In the end, hiring the service of an expert just saves you more time and money.
It is normal to spend hundreds of dollars to skim-coat your home. While you can do it yourself, the process might be too tasking and labor-intensive, so it might be best to hand the job over to experienced professionals for an expert finish.
How to prepare your home for a skim coat?
- First, you should arrange and clear out furniture and other items in the space to leave a conducive space for working. This would also come in handy for you if you wish to be sure that your furniture will be protected from drops or any damage.
- For instance, you would have to deal with furniture or wall items that you cannot move, covering them with plastic should be enough protection. This should also apply to floors, which you can cover with paper, or drop cloths.
- If your ceiling has smoke alarms or other electric wirings involved, you should also make sure that they are secure and turned off. After that, covering them with tape and plastic should make them safe from splatter or spillage.
- If you are hiring contractors to do the job, they would most likely do these for you. You can ask them if their team would cover the furniture and floors for you, or you can ask them to do so.
Process of skim coating a ceiling
Skim coating a surface is one of the methods that can make a wall or ceiling appear smoother and newer. Also known as a level-five drywall finish, a skim coat can be applied by hand, a roller, or by a spray rig.
Repair the ceiling
Firstly, if your ceiling has a lot of damage, it needs to be repaired first before a skim coat is applied. Any visible damage such as cracks and holes should be patched. This is also to further repel any unwanted moisture to settle between the surfaces.
Apply the skim coat
After the necessary fixing of damages, the skim coat is applied. This is usually done in sections, and not immediately in all the ceiling areas. Once the contractor or the hired professional applied the coat, it is then slowly smoothed out before it dries.
The home stretch
The contractor usually works the coat in a manner where they slowly thin out the consistency of the mud across the surface using a heavy-nap paint roller. Then, using a squeegee knife, the mud will be smoothed out even further.
After the contractor is finished with the small sections, the first layer is left to dry out. Then, it will be inspected for imperfections, which will be sanded out. When it is ready for another layer, the same process of applying and smoothening will apply.
Usually, skim-coating projects would require at least 2 layers or more. The layers after the first one would correct the imperfections of the initial layer. Once the first layer has dried, the contractor will sand the ceiling and it is finally finished.