Drywall taping joints may be an easy task to complete, but it takes a careful craftsman’s hand to get good results in the overall finish. When considering this for your home, your first step should be budgeting for the materials, supplies, and labor.

The average cost to tape and finish your drywall joints stands between $0.90 – $1.20 per linear foot. These costs could be higher depending on the size of the work and the condition of your drywall.

Cost to tape drywall joints

Your total costs to tape drywall joints will largely depend on whether you’re hiring pros or doing a DIY.

If you’re hiring a drywall contractor, expect to spend anywhere from $20 to $60 an hour for the job. If the bill by square feet, your labor costs will range from $0.35 to $0.80 per sq. ft.

Expect to also spend between $0.03 – $0.07 per linear foot on material costs or more depending on the size of the job.

Cost to tape drywall joints
National Average per linear foot1 foot$1.05
Cost for labor1 hour$40
Average for 500 linear feet500 feet$425

Cost to tape & finish drywall joints

After taping the joints, the plaster compound, also known as “mud,” needs to be added to seal the joints entirely with a smooth ready-to-paint finish.

The average cost to tape and finish drywall joints ranges between $0.90 to $1.20 per linear foot. Your finish option adds to the cost by around $0.03 – $0.10 per linear foot

Cost to tape & mud drywall joints
National Average per linear foot1 foot$1.05
Cost for labor1 hour$40
Average for 500 linear feet500 feet$525

Extra cost considerations

Besides the labor costs of taping and mudding the drywall, your contractor may include some extra charges in your quote depending on the following factors:

Excessive gaps in drywall

The more gaps you have on your walls, the more tape you’ll need and the more hours a contractor will spend on the job. Bigger gaps will also have the same impact. Expect to pay up to $100 per hole for the patching activities.

Filling screw holes

The presence of screw holes on your drywall means that you’ll have to spend extra on joint material to fill these holes. Most contractors will charge you around $60 more for this service.

Skim coating

If your drywall will need a skim coat before the painting or priming, expect to spend between $1 – $1.50 per square foot on the job. These costs could be higher depending on your contractor’s rates and the complexity of the job.

Cost to DIY tape & mud drywall joints

Cost to DIY tape & mud drywall joints drywall tools

Tools required

  • Box of mud and joint compound – $8 (per 3.5 gallon)
  • Drywall screws – $6
  • Joint tape – $13
  • Drywall adhesive – $12.50
  • Mask – $20
  • Corner trowel – $13
  • Sandpaper – $12
  • Corner bead- $7
  • Utility knife – $13
ServiceQTYDIYPRO
National Average per linear foot1 foot$0.20$1.05
Cost for labor1 hour$0$40
Average for 500 linear feet500 feet$100$525
Average saving for DIYDIY = 525 % Cheaper than a Pro

5 Tips for taping drywall seams

If you’ve ever tried drywall taping your seams, you know that achieving that extra smooth surface isn’t as easy as the experts make it. Here are five tips that can give you an edge to get better results when taping.

Pay extra attention with the first coat

When drywalling, most people focus on sanding and the finishing coats but end up disappointed with some cracks on the seams.

Taking some time to ensure that your tape is well embedded in the joint compound for your first coat is the secret to good finishes. It creates a solid foundation and makes it easier to apply the other coats.

Look for the right mud!

One of the biggest mistakes new tapers, especially DIYers, make is choosing the wrong mud. Most experts recommend using an all-purpose, also called a setting compound mud, for all the coats except the last one.

Avoid any ‘fast-setting compounds if you’re beginning because they could dry before you smooth it.

Moisten the compound with water first

When working with a premixed compound, you might have trouble applying it in a straight line or in corners due to its thickness. To avoid this, try moistening the compound with water to make it softer and easier to apply. You can also dip your tape in water first to improve its adhesion to mud.

Don’t use too much pressure!

When smoothening your tape with a knife, be careful not to exert too much pressure. Doing so will create bubbles on the drywall, which will affect its overall finish. Also, if you can’t handle a full-length tape, cut it into smaller pieces with your knife to avoid wasting the tape.

Don’t scrape away all the mud

When trying to squeeze mud out of the tape, ensure that you leave enough mud behind the tape to guarantee that it bonds effectively. One mistake many people make is using a lot of pressure which leaves a very thin mud coat – resulting in drywall seams that crack with time.

What are the levels of drywall finishing?

There are six levels for any drywall finishing service recognized by the Gypsum wallboard industry and most professionals. Here’s a guide to what each level entails for your drywall project.

Level 0 – In this level, no finishing or taping has touched your newly hanging drywall. The idea at this stage is that only your drywall contractor and his crew will see the wall. You’ll only need this finishing level when dealing with temporary structures.

Level 1 – The highlight of this level is that the drywall joints and interior angles have tape entrenched in the joint compound. No sanding, adding mud coats, or screwing is required as finishing at this level is still not open for public viewing. You could stop at this level if you needed a drywall finish for smoke barrier purposes.

Level 2 – Characterized by application of a coat of joint compound on all joints and interior angles and wiping it with a joint knife to give a thin joint compound coating. All accessories and fasteners are also covered with a layer of joint compound. Ridges and tool marks are common and acceptable for this finish.

Level 3 – After the two coats of joint compound on level 2, an additional coating is applied to joints and interior angles. Screws, tapes, fasteners, and other accessories will then be covered with two coats of the joint compound. Sanding is needed on all surfaces to eliminate any tool marks or ridges. Typically, this finishing level is well-suited for walls that require heavy or medium texture finishes.

Level 4 – This is the most common finish level for wall surfaces in many homes. In this step, the contractor applies another joint compound coat (making it three coats from level 3), then sands down any ridges or tool mark once it’s dry. This level is done where flat paints, wallcoverings, or light textures will be used. The drywaller may also apply a paint primer before painting.

Level 5 This final level takes all the process of level 4, but an extra coat of joint compound is applied to the entire wall and ceiling surfaces. This is done to conceal any imperfections on the wall and minimize effects like joint photographing. It’s the highest level of drywall finish, and it’s at this level that contractors use semi-gloss finish, high-gloss finish, non-textured paint, and other decorative finishes.

FAQ's

Yes! Taping drywall joints is crucial because it improves the strength of your joints while the joint compound or mud enhances the adhesion of the tape. Taping the joints also ensures that no visible seams are evident once the joint compound is dry.
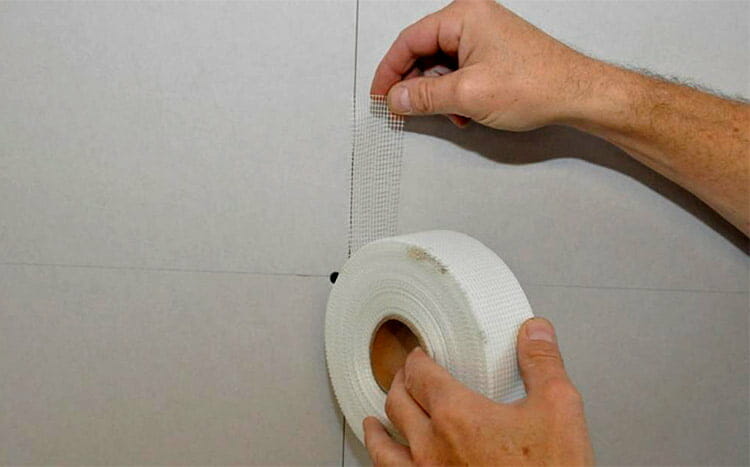

Most drywallers tend to think so. Drywall tapes are considered to be stronger, easier to install, and more versatile than mesh.

However, mesh is good for preventing any cracks on your drywall seams. It also offers better moisture resistance and curves more easily, making it perfect for corners and high-moisture areas.

Overall, the final verdict will be guided by your preference.

Yes. You should lightly sand in a uniform direction between every coat of drywall mud to get rid of any bumps and valleys and come up with a smooth finish.

It depends on where you want to overlap. Never overlap your paper tip near the internal corners that meet your ceiling, as it will lead to a thick tape build-up that’s harder to finish. You can, however, overlap when taping the butt joints and recessed joints.

Drywall tape can cover gaps of from 1/8 inches to wider gaps bigger than ½ inches.

FAQ’s  tape drywall

Benjamin McInerny
Author: Benjamin McInerny - is a qualified arborist and a DIY Home Improvement enthusiast. Ben has a extensive experience on renovation projects including, mold removal, painting, fence installation and more. Ben shares his skills with DIY and gardening enthusiasts.